
Last Updated on April 8, 2023 by Ellen Christian
I love nail art. I could spend hours wandering through Pinterest looking for easy Valentine’s nails that I could do. Check out this simple Valentine nail art idea.
Posts may be sponsored. This post contains affiliate links, which means I will make a commission at no extra cost to you should you click through and make a purchase. As an Amazon Associate I earn from qualifying purchases.
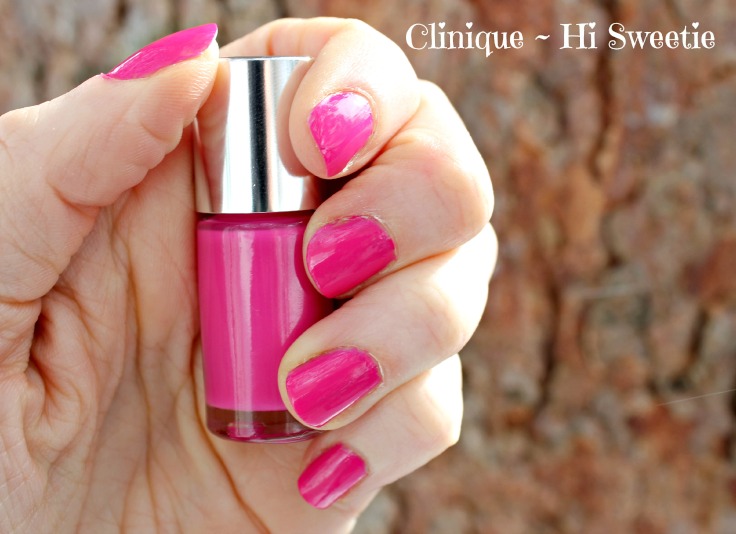
Table of Contents
Easy Valentine Nails | Pink Nail Art
I know better than to try anything too complicated. As gorgeous as polka dot nails or nails with tiny flowers painted on them look, I just don’t have the skill or the patience to do that.
I decided to play around with some pink nail art that was easy for Valentine’s Day. While I did it with Valentine’s Day in mind, really you could do it any day that you’re in the mood to have fun pink nails. It’s easy enough that anyone can do it – trust me.
How to make Valentine nail art
- Always start with clean, polish-free nails that have been neatly filed.
- I add a base coat which helps the polish wear longer. I really like Orly Rubberized Basecoat because I think it wears really well.
- After that, paint your entire nail one color. This may take 2 coats. Be VERY certain they dry completely between each coat and that your final coat is completely dry before you proceed to the next step. I like to wait at least an hour but it really depends on your polish. I used Clinique Hi Sweetie as the pink color. Both the colors I used for these easy Valentine nails came from the Clinique Party Lips and Nails Gift Set I bought at Macy’s.
You can use any of these pink nail polish colors.
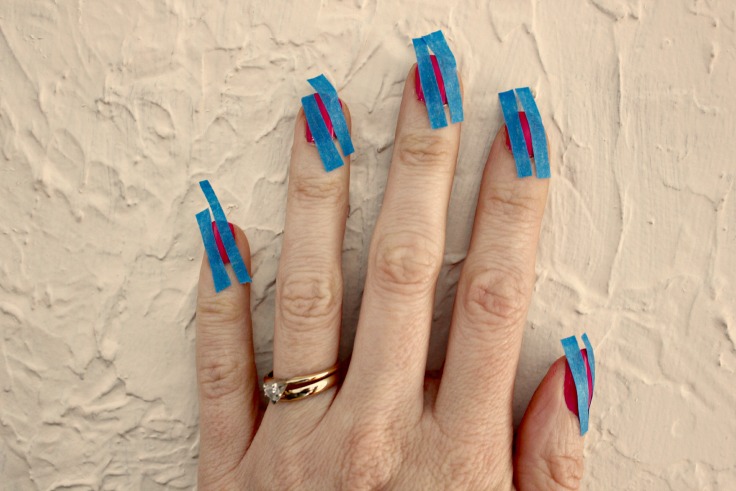
Making stripes on your nails
- After that, you need to cut very thin strips of blue painter’s tape to make the lines on your nails. If you have that fancy nail tape, you can use that instead but blue painter’s tape works great for me. Line the tape up carefully to have a thin space in between where you’ll paint a line of purple polish.
- Very carefully paint the area in between the painter’s tape in a different color. I chose Clinique Hot Date as the purple.

- Remove the blue painter’s tape while the polish is still wet and then let it dry completely.
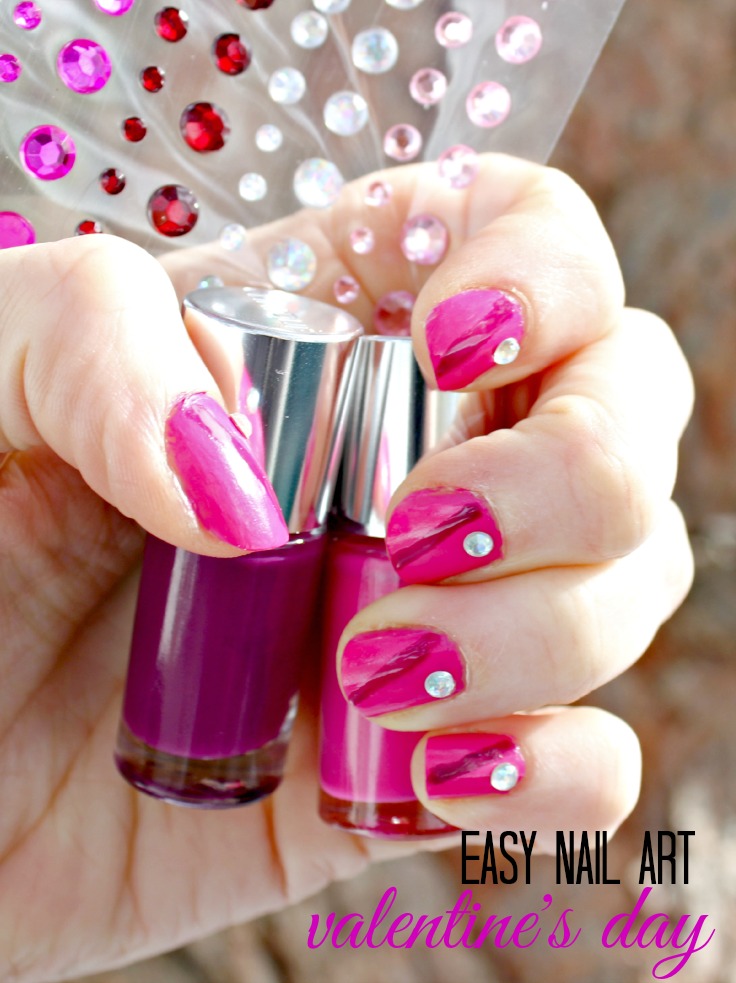
- Apply a clear top coat and let it dry completely.
- Add a glitter spot or polka dot or nail sticker to one half of the nail. I used stickable jewels from the craft store. You can use nail stickers or do it free hand if you’re good enough to do that.
- Enjoy! You’re all set for romance with these easy Valentine nails!
If you’re looking for other ideas to make your Valentine’s Day a little bit more special, I’m sharing a few ideas from my favorite bloggers.
- Romantic Date Night Outfit from Style on Main
- Peppermint Chocolate Milk Bath Recipe from Pretty Opinionated
- From Day to Night Valentine’s Day Outfit from Day by Day in Our World
- Rock and Roll Valentine’s Day from April Golightly
- Pumpkin nail designs
- Romantic Valentine’s Day ideas
- Spa ritual nail polish review

The Socialite’s Closet is a style and beauty destination created for women over 45 who want to feel confident, modern and effortlessly put together. Here you’ll find fashion inspiration, beauty tips and easy-to-follow styling ideas designed for real life.
This is a great color combo. Love your DIY style.
Thanks, April. I have a long way to go in the nail art area but I’m trying LOL!
Those came out so cute! Now if I could just stop biting my nails! I collect beautiful pictures of nail styles to inspire me, one day it will actually work.
Thanks, NIkki. I have tons of images pinned but most are beyond me. I will keep trying and some day… !
I love pink polish! Don’t think I’ll ever be into nail art–just not my thing. Guess I’m odd like that, I like just one color and that’s it, lol.
One color works just great too, Deb!
This nail art looks relatively easy to do, I’d love to give it a try. Thank you for sharing this post.
It definitely is easy. Check out my latest one for St. Patrick’s Day!